Click the arrow next to “Marker Tools” and select “Excel”. Choose to upload a Basic File, a single CDR file, or a CDR file along with the Tower file. Click <Select Tower File> and browse for the file to upload. When the file is uploaded, click the dropdown box next to “Available Workbooks” to select which worksheet in the spreadsheet contains the information to be used.

If the first row of the worksheet has header information in the columns (i.e. “Latitude”, “Longitude”, etc.), then check the box next to “First Row Header” and click <Next>.
If the box next to “First Row Header” is checked then select the column header in the spreadsheet that corresponds to “Latitude”, in the dropdown box next to “Latitude”. The select the column header in the spreadsheet that corresponds with Longitude in the dropdown box next to “Longitude”. Click <Set>, to plot the towers. DART is now ready to add the CDR records.

Click <Add Records File> and browse for the CDR records to upload. Once the file is uploaded, click the dropdown box next to “Available Workbooks” to select which worksheet in the spreadsheet contains the information to use. If the first row of the worksheet has header information in the columns (i.e. “Target”, “Date”, “Time” etc), then check the box next to “First Row Header” and click <Next>.
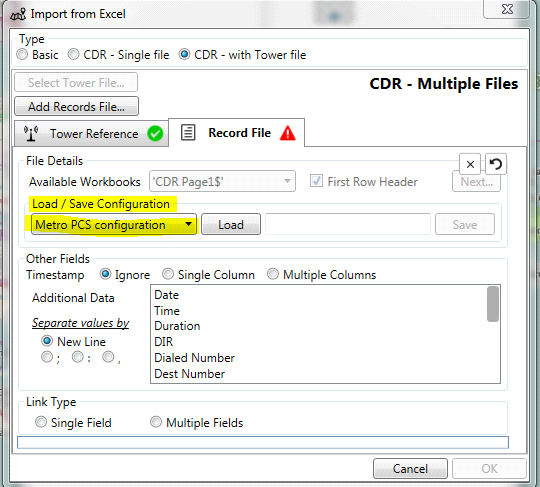
Choose to Load or Save a configuration. If the same field mapping/configuration is be applied to a different CDR in the future, enter a label into the blank box in between the “Load” and “Save” buttons. Don’t click <Save> until the field mapping selections under “Other Fields” and “Link Type” have been completed. Loading a configuration loads the preset configurations/field mapping saved previously.

The records timestamp may be in a single column or in multiple columns. Select single column or multiple columns next to timestamp; or, if that option is not wanted, choose “ignore”. For a Single Column, select the name/header of the column in the spreadsheet that the timestamp is under. If the timestamp is in multiple columns, select the column header under the date and the column header under the time.
To include additional data, if any, select them in the box next to “Additional Data”. To select more than one type of data, hold down the “Ctrl” key while clicking the items to be selected.
Underneath “Separate Values By”, select how the selected columns are separated in the detail of the marker.
To link the tower and CDR spreadsheets together in order to make the connections, select whether connections are made based on one field/column, or multiple fields/columns in the spreadsheet. Typically, the most important fields to map are the switch, sector, and cell. The cell may be labeled as “tower” in the CDR spreadsheet. To add additional fields click <Add>

To save the applied field mapping for later use, click <Save> under “Load/Save Configuration” when entries are finished
To apply the field mapping click <Set>. The data selected to be included in the mapping appears at the bottom of the box. Click <OK> to return to the Layer Properties Box. Enter a label for the layer/CDRs just created and any notes to be included. Change the icon if desired, as well as the anchor point of the icon. This means where the exact point of the icon is placed on the map

Click the gear button between the plus sign and arrow next to “Marker Tools” to generate a path from the established points

It’s most common to use the timestamp information designated when field mapping the CDRs, so select timestamp. All of the markers with timestamp information populate the box. Click <OK>. Select “Use Index” to add the path by the order listed in the spreadsheet, ignoring the timestamp. Be aware that timestamps could be out of order in the source data.

Click <OK> in the “Layer Properties” Box to plot the markers and paths on the map.

To add another CDR follow the same process. To save time and map the fields exactly the same as a previous uploaded CDR, load a saved configuration. Choose which configuration to load from the dropdown box “Available Mappings” under “Load/Save Configuration”. Then click <Load>.