Common Communications
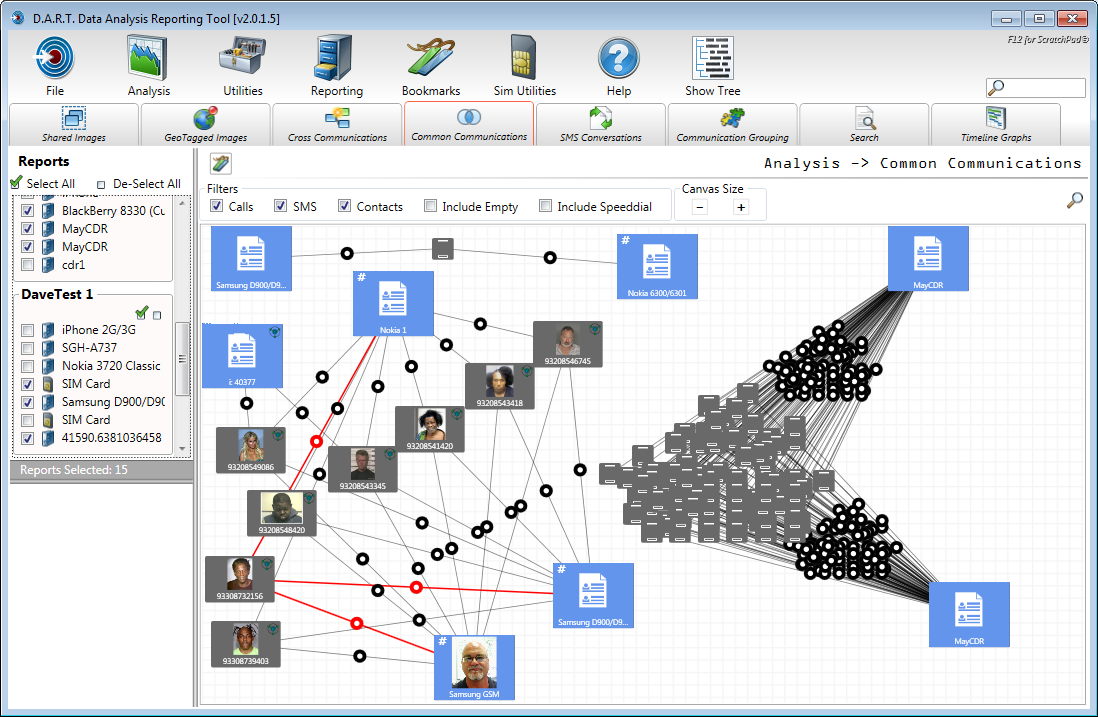
Common communications are calls or texts that are common between reports in the case. This provides identification of common communications by phone number or by report. The display can be filtered to show only calls, SMS text, and Contacts. Additional filters are Include Empty and Include Speed-dial. This allows the exclusion of blank phone numbers or speed-dial numbers from the display. To enable or disable a filter, check the box to the left of the filtered item. The list can also be filtered by unchecking phones from the case tree.
Initial View
Initial view of the Common Communications screen is set by the number of elements on the screen. Additional elements align down the left side as added. Once everything is added and all filters (checkboxes at the top) are engaged, the layout can be adjusted by dragging the icons around to position them in a better arrangement.

This layout persists while working in the current session and the view can be bookmarked and/or printed. Click the magnifying glass icon to search for a specific phone number. If the number is in the layout it should be shown after entering at least the first 4 numbers.
Nodes
The two types of nodes displayed in this layout are the blue Report Node and the gray Phone Number Node. The blue Report Node displays the report label and headshot or Global Contact picture, the GC being the dominant image. The gray Phone Number Node displays the phone number and the Global Contact image if one is found that matches the phone number.
Both nodes have a right click context menu.
Report Nodes: In the Report Node context, there is a View Details menu, and a Global Contacts menu.

The Global Contacts menu has three additional sub menus; Add to GC, Merge with GC, and Edit GC. The Add/Merge GC options are shown when a GC has not been associated with the Report Node. The Edit GC option is available after the Report Node has been associated with a GC. If a report has been associated with a GC, there is an option to remove the GC reference.


In all Report Node cases, the View Details option shows the communications details of the selected node.

Phone Number Nodes: The Phone Number Node context has a Shrink option, and a Global Contacts menu. The Shrink option allows the Phone Number Node to be reduced to a smaller size to make viewing and arranging easier. Right click a shrunken item to restore it to the original size.

The Global Contacts menu has three additional sub menus; Add to GC, Merge with GC, and Edit GC. The Add/Merge GC options are shown when a GC has not been associated with the Phone Number Node. The Edit GC option is available after the Phone Number Node has been associated with a GC.


Connecting Lines: All nodes are connected by lines that have a round “hot spot” in the middle. This makes clicking on the line easier and more accurate.
A single click on a line shows a connection between the Report Node and the Phone Number Node. Multiple lines can be selected by holding the left CTRL key down while clicking.
Double click the line to show details of that line of communication.

Interaction
Selecting a Report Node shows direct connections to Phone Number Nodes in RED. Secondary connections are shown in ORANGE.

Selecting a Phone Number Node shows connections to a Report Node in RED.

Selecting a line highlights the line in GREEN.

Hold down the left CTRL key and click to allow multiple lines to be highlighted.

Searching Results: Click the Search icon to open a search box. This searches for matching phone number/MSISDNs from the reports and nodes. As the user types, matching objects are highlighted. Click the blue reset arrow in the search box to reset the search. Click the red X in the box to close the search.

Changing the View Size: Clicking on the “-“or the “+” in Canvas Size to expand and contract the layout background (canvas). The canvas default size is the lower limit.


Zooming and Moving: Once the canvas has been enlarged, the mouse scroll wheel can be used to zoom in and out on the view. A click and drag is used to reposition the canvas. If the canvas is moved too far off the screen, a reset view is done by right clicking in the blank area outside of the canvas grid.

Bookmarking Common Communications: Click the bookmarking icon to add the page layout to a bookmark report or sent to a printer. A notes dialog allows for annotation of the bookmark before storing it. See chapter 9 for more details on how to use Bookmarking.
